|
|
|
Written by Administrator
|
|
Thursday, 01 April 2010 07:04 |
|
I am probably like most people who fail to read manuals. They always end up in the bottom of a drawer some place never to be found. Luckily, I had nothing to do one day and decided to read my GY 401 manual. It has an idiosyncrasy not found in any other gyro I have used. When first turning on the power to your radio gear, you must have your transmitter turned on and have the gyro mode set to heading hold. You must also make sure your rudder trim lever is centered and make sure you do not move the rudder stick.
These precautions must be followed because this gyro stores the neutral value of the rudder channel each time the gyro is powered. It only stores these values when turned on in heading hold mode. When the power is turned on in normal mode the indicator LED on the unit flashes an alarm code. If you fail to follow these procedures you can still save the neutral settings by switching between heading hold mode and normal mode very quickly. Three times within one second is required. This tells the gyro to store the current rudder input as the neutral position.
One other nice feature is re-centering of the tail in heading hold mode. When walking the machine to the flight line in heading hold mode, the tail will drift to one extreme. Centering the tail is always a good practice as it puts less load on the tail drive and engine during spool up. You can center the tail the traditional way of switching to normal and then back to heading hold. But, for those people who may not have the gyro mode tied to a switch, you can perform the same function by wiggling the rudder left and right very quickly. Again, three times within one second is required.
|
|
Last Updated on Thursday, 01 April 2010 07:08 |
|
Written by Administrator
|
|
Thursday, 01 April 2010 07:03 |
|
The Futaba GY601 is a very high performance gyro. Its lightening fast servo the S9251 can not be used with any other receiver due to its high data rate requirements.
In order to maximize the life of this expensive servo you should avoid excessively high gains. I have found that increasing the gain of this gyro does not substantially improve the holding power while it does over work the servo and cause them to burn out prematurely. I like to keep my gain settings under 40%. This setting is more than adequate on all my models. This gain is the gain shown on the gyro screen which may or may not match your radio settings. Always go by the gain displayed on the control module.
The other thing you can do to increase the life of the servo is to make sure the limits on the control module are above 100% Anywhere from 100% to 130%. Setting the limit below these seems to over work the servo. I also like to make the limit settings for the A side and B side the same. You accomplish this by mechanically adjusting the tail rotor linkage to be in the middle of its travel at center stick. Make sure you do this in non-heading hold mold. Once you have the linkage mechanically centered it should hit the left and right stops and the same limit setting. Now adjust the servo wheel diameter such that you can achieve over 100% for the limits. Again, make sure the A and B side limits are the same. |
|
|
Written by Administrator
|
|
Thursday, 01 April 2010 07:02 |
|
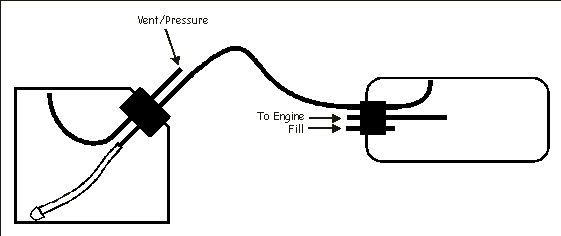
Using header tanks has many advantages one of which is to prevent air bubbles from entering the engine carburetor. In helicopter application where there is a lot of high frequency vibrations, fuel can start foaming in the tank. This can cause the engine to suck air and lean out or worse, stall. Header tanks help this situation because these tanks remain full at all times and thus does not contain enough air to cause fuel foaming. The basic plumbing of such a tank is illustrated below.

The engine pickup is from the center of the header tank. This ensures that the pickup will always be in fuel as this tank is always full. The system must be filled through the header tank. The main tank starts filling only when the header tank is full. As fuel is fed into the engine the exact same amount is pulled from the main tank. This ensures that the header tank remains full. The engine feed must be pinched in order to prevent flooding during the filling operation. The main tank can either be pressurized or not. |
|
Last Updated on Monday, 05 April 2010 06:26 |
|
Setting up Heading Hold Gyros |
 |
 |
 |
|
Written by Administrator
|
|
Thursday, 01 April 2010 07:00 |
|
Heading hold Gyros are different from standard gyros in that standard gyros are just rate dampening devices they only resist movement including movement you input from the rudder stick. Heading hold gyros are rate on demand devices which moves the tail at the rate you tell it by moving the stick. When the rudder stick is neutral, the tail is locked into position. Gusts of wind or power changes will not cause the tail to move. For this reason, tail mixing is not required. In fact you can not use tail mixing at all since this would be interpreted by the Gyro as a tail command and the helicopter would start to pirouette.
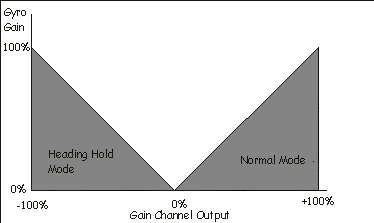
Therefore, the first step in installing a heading hold gyro is to remove all tail revolution mixing. Make sure you do this in all flight modes. Next you should make sure all trims, sub trims, stunt trims, and trim offsets are all set to zero. You should also set the rudder ATV's to 100%. Most Heading Hold Gyros have both normal and heading hold mode. The modes are selected by different gain levels. -100% gain is usually maximum heading hold gain and +100% is maximum normal gain. See chart below. You should connect the gyro gain input to an aux channel that has a switch and then program this switch to -100% and +100%. You tell which mode your in by looking at the tail movement. If you move the rudder stick and then release it and the tail returns to center then you are in normal mode. If on the other hand the tail remains at the extremes or just does not center then you are in heading hold mode.

The next step is to trim the tail. This is done by switch the gyro between normal and heading hold and then watching the servo. Place the gyro in normal mode to center the tail servo. Now switch to heading hold and note the servo movement. If the servo moves from center then add a bit of trim and try again. If the movement gets worse then you went the wrong direction. Keeps adding trim until you can switch from normal to heading hold without the tail servo moving. It should remain neutral for at least 30 seconds. It may slowly drift after this but that is normal. Now try and fly the helicopter in heading hold mode. If tail may need a little further trimming so perform that here. After that you can not touch the trim. If you find the helicopter does not track in normal mode you must mechanically trim the tail. Do not use the trim tabs as this will but the heading hold mode out of trim.
As mentioned the heading hold gyro is a rate on demand device. If you find the pirouette rate is too high then you want less demand. This is accomplished by reducing the travel adjustments or ATV's on the rudder channel.
One artifact of this setup is that a lot of trim may be required to trim the Heading Hold mode. This trim can cause less rudder travel in one direction than the other. The end result will be different pirouette rates to the left or right. To counteract this you will have to increase the ATV setting in the direction of the slower pirouette. |
|
Last Updated on Monday, 05 April 2010 06:19 |
|
|
|
|
|
|
Page 1 of 2 |