Automotive Resources
| Pumped Up |
 |
 |
 |
| Written by Administrator | ||||
| Sunday, 08 May 2011 07:36 | ||||
|
Power, you always want more. Being a 4000lbs car the Challenger needs a powerful engine to get the 1/4 mile time I was hoping for. I did manage to pull off a 12.91 but most of my times were in the 13.3 range. I was hoping to get to low 12s and possibly high 11s. I started looking into power adder options even before I purchased the car. I looked at various centrifugal superchargers, NOS systems, and even Turbos. There was a lot of aspects that affected my decision. I wanted at least 150HP gain but I also wanted whatever addition to look decent. I also wanted it to allow the car to pass the emission testing we have in BC.
Turbos definitely gave the power but I did not like how these systems mounted under the vehicle. Some require removal of the CATS so I decided against this route. NOS kind of scares me, it seems too hard on the engine so I decided against this route as well. I looked at centrifugal superchargers like Vortech and ProCharger. I did not like the look of the Vortech with its inter cooler over the left cylinder bank. I was leaning towards the ProCharger. They were the only company that sent me an installation manual when asked. The problem with the ProCharger was the lag for the supercharger to build boost and I also did not like the visible inter-cooler through the front grill. I then heard about the Twin Screw Supercharger offered by Kenne Bell. Twin screw interested me as it builds boost at low RPMs and also generates much less heat than a Roots style supercharger. I started doing more research in this area. Kenne Bell has a long history of developing superchargers. Their website offers lots of useful information on their technology, comparisons with other technologies, and general tech tips on such things as fuel systems. In searching forums everyone was praising the Kenne Bell unit. It also has the capability of producing over 20psi of boost if ever required so there is lots of room for expansion in the future. And, IT LOOKS COOL. So I pulled the trigger and purchased a polished 2.8L kit from Mr. Norms Garage. Three weeks later two HUGE boxes showed up at my front door. I figured I should have a boost gauge so while waiting for the supercharger to arrive I installed some gauges and additional wiring required for the inter-cooler water pump. Check out my gauge install section for details. The installation manual is huge for this kt. Everything you need to complete the install is included, even some special tools like a fuel rail disconnect tool. The only thing missing was a fitting and hose used to bleed the coolant system at the end of the install. I did not follow the instruction sequence completely as I was doing this install in my tiny garage so I wanted the car drivable until the last possible moment. I wanted to get the tedious things out of the way first so I completed all the electrical work first. I had already installed the power system required for the water pump so adding the provided relay and harness was very simple. I then installed the boost-a-pump system used to increase the fuel pump voltage during boost conditions. The Boost-a-pump is installed in the trunk on top of the rear PDC unit. It is wired inline with the fuel pump power. It then has a long wire that connects to a pressure switch in the engine compartment. The manual says to run this line under the vehicle but I did not want to drill a hole in my trunk as instructed. I took the time to run this line through the inside of the vehicle. I routed this line along the main power lead from the battery, then to the drivers side of the car under the rear seat, then under the rear quarter panel, under the drivers door sill, behind the kick panel, and then through the same hole in the firewall that all my gauge wires went through. It then runs behind the engine and was temporarily coiled up by the evap valve. Lots of interior parts had to be removed to route this wire. The service manual sure helped. There are lots of snaps to release and knowing where to pull will help prevent damaging any panels.
With the wiring out of the way it was time to dig into the main install. I drove the car onto ramps to remove the belly pans. I then backed it off and removed the front facia. There are 6 plastic rivets that have to be drilled out that fasten the inner fender panels to the front facia. Care must be taken when drilling these to not allow the entire rivet to spin or you run the risk of melting the panel itself with the head of the rivet, Ask me how I know... Once these rivets are removed you need to remove two bolts under the panel. You then have to bend the panel out out of the way and reach way inside to reach two more nuts securing the facia. This is a real pain. Then remove the covers/cup holds on the top side, remove the push pins in the facia, and the two top bolts. The facia then pulls off but you must release the lower facia from the fender first. The manual was not clear here. They said you have to pull the lower facia down but you really have to pull it out, perpendicular to the plane of the front wheels. Once these are unsnapped the facia pulls right off. I then removed the bumper shroud and set aside.
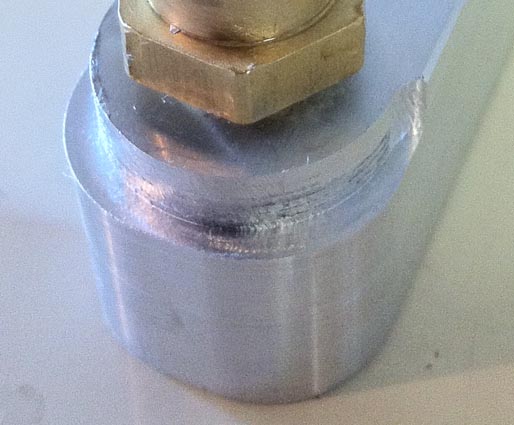
I then drove the car back on the ramps to drain the coolant, this is where I ran into my first issue. You must turn the petcock on the radiator to drain the coolant. Well, doing this had no effect, this system would not drain. I drove the car off the ramps in case the front end was too high but that had no effect. In the end I had to remove the lower rad hose from the engine to drain the coolant, and make quite a mess in the process. At this point the vehicle is no longer drivable so it was a lot of pushing my vehicle in at out of my tiny garage from here on out. I then removed my K&N CAI, which is now for sale if anyone is interested. I then removed the stock intake manifold. I could not unplug the map sensor so I unbolted it and removed it later. Next the stock heater lines running through the intake valley were removed. The heater line bypass fittings were then assembled and installed, almost. This is where I ran into issue number two. The passenger side block would not insert all the way as it hit the engine block. Luckily I have a milling machine so I milled out a section of this block so it would fully seat. I then installed the replacement heater lines.
Using an air jigsaw, I cut out the opening for the intake inlet tube. This was real fun. Hacking apart a car with only 3k on it was a little sad. To keep on with the destruction, I removed the cross brace that needs to be modified to make clearance of the Mamoth intake of the super charger. Using an angle grinder I removed a portion of the brace that holds the wiper motor. I left it off while doing a few other things. Next was replacement of the spark plugs. I used a set of NGK plugs that are one level cooler than stock. These were gapped to .035 before installing. The plugs that came out were gapped way bigger than 0.035 so I hope the new plugs work as expected.
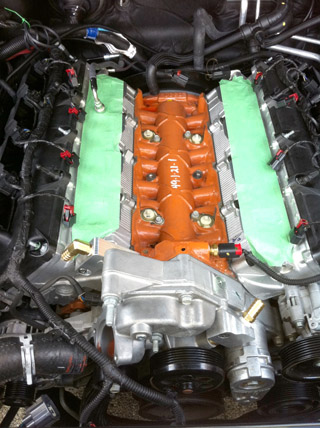
Next the Discharge assembly was installed and torqued down to spec. The Heat exchanger was bolted to the bumper and the coolant reservoir slid into the mounting bracket molded into the stock engine coolant reservoir. Then all the coolant lines were installed to the discharge, heat exchanger, pump, and reservoir. I also re-installed the cross brace after the paint I applied to the hacked off areas had dried. Here is what looked like at this stage.
Now the part I have been dreading, I had to drill the crank to install 2 dowel pins. First the fan assembly was removed, and then the crank bolt. The supplied drilling jig was installed and drilling started. There is hardly any room between the pulley and radiator so you need a small angle drill or this is not possible. I have an 90 degree air drill and even that left no room to get enough pressure on the drill to make any headway. After an hour of making no progress I decided to get a long 1x4 and use it as a lever. I placed it in between the rad and drill, one end touching the bottom rad support, the drill hitting half way up the board, and pushing on the other end. This leverage made all the difference. I only drilled a little bit at a time and kept adding spacers between the board and drill to keep the force on the drill as parallel as possible. Finally, the holes were at the required depth. Now to install the dowel pins. The problem here is you can not see the holes without a mirror. I tried a few different approaches to try and get these started. In the end I used a deep socket that the pin fit into but left the end of the pin sticking out 5 mm or so. Tapping on the end of the socket the pin slid into the hole easily. The pins were then tapped in the rest of the way. The Crank bolt was then re-installed and torqued. Before I re-installed the fans, I took the opportunity to replace the thermostat with the supplied 180 version while I had extra room. After this was replaced, the fan assembly was then re-installed.
I had a friend come over to help install the main super charger. I first had to install the oil filler spout onto the discharge but found that one of the bolt holes was not tapped. So I had to tape up a big portion of the discharge and tap this hole and carefully remove all the swarf. The oil filler spout was then installed. We then made our first attempt at installing the super charger, this did not go so well. The by-pass valve vacuum diaphragm hit the cross member. I removed the diaphragm temporarily and continued. I then noticed the mamoth intake tube was hitting the cross member as well. We had to pull the super charger out enough to allow removal of the cross member for more modifications. We re-installed and attempt number two started. Well the supercharger fit but the clearance with the cross member was under 1mm, so out it came again. The third and final attempt was successful. The belt pulleys were then installed. You first install the mounting plate that goes around the super charger output shaft and is bolted to the water pump. The pulleys were then installed to this plate. Unfortunately, the lower pulley standoff would not fit, it hit the driver side heater house block. These parts have been a real pain. We had to modify the one standoff to clear the block. After solving this the belt was finally installed. This was another pain, it was real tight. When we finally got it installed the tensioner was at its maximum deflection. I sure hope the belt is not too tight.
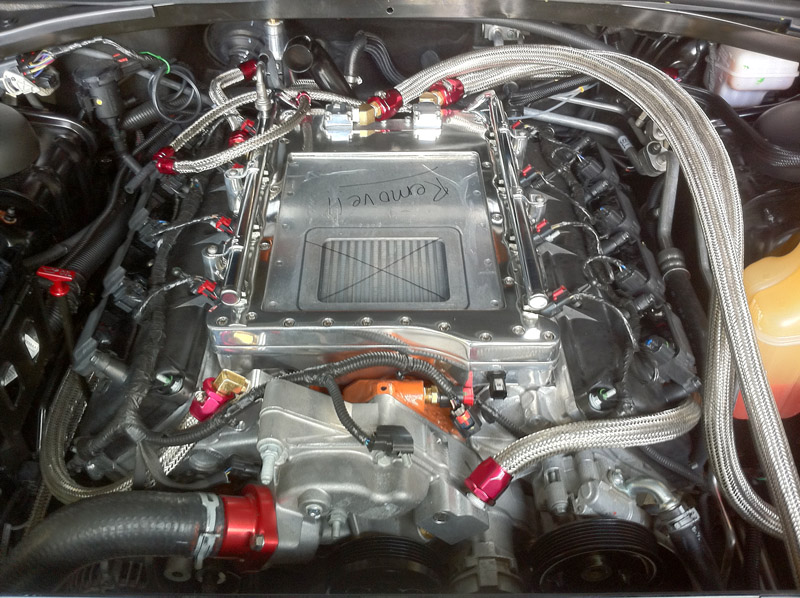
Well, the wiring was not quite complete. I had to extend the harness for the Inlet Air Temperature (IAT) connector and the Electronic Throttle Control (ETC) connector. To get the length of the ETC cable correct I decided to install the throttle body along with its adapter plate at this time. The harnesses were extended and finished off with corrugated loom covers. It was getting to dark to go any further.
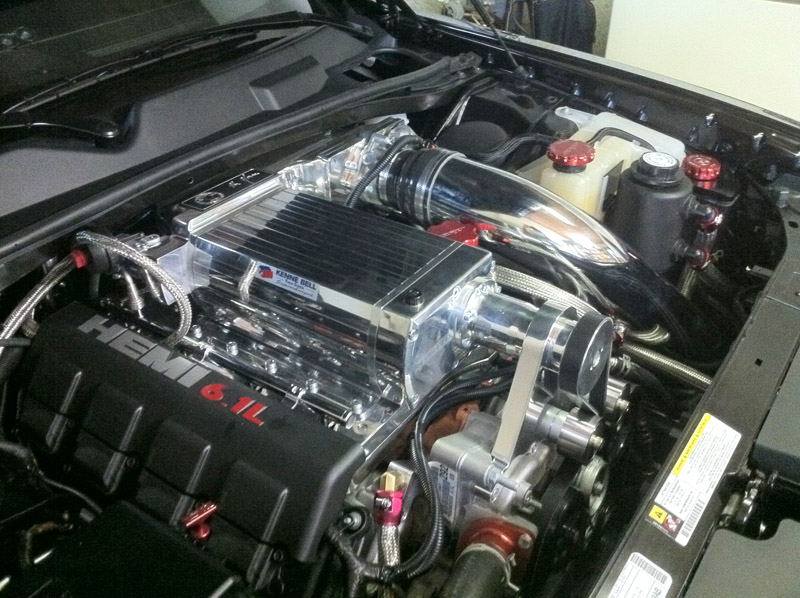
Getting close to the finish line. I started the day by installing the boost-a-pump pressure switch and routing the cable from the boost-a-pump wires to the back of this switch. I then had to modify my engine covers to allow clearance or they can not be re-installed. This was anther job I was not looking forward to. I then installed the Air intake tube and air cleaner. There is not much room to attach the air cleaner. It took quite some time to get it installed. I am not sure why they did not add another inch or so to the length of this pipe, it would have been much easier to install the air cleaner. I then re-programmed the ECU with the supplied predator tuner. It was then time to refill the coolant system. I installed a fitting and long hose into the water pump bleed fitting and started to re-fill the coolant. Another problem soon arose. The coolant would not flow into the engine. I filled the over flow reservoir right to the top but the fluid would not migrate into the engine. I tried taking the thermostat out hoping that more venting would help, no luck. With no other ideas, I placed my hand over the filler, tried to make an airtight seal, and blew into my hand. Voila, fluid started to flow out of the reservoir and soon came out the bleed hose. I put the plug back in the water pump and topped up the reservoir.
Ok, the moment of truth, time to see it would run. I cranked her over and she came to life immediately. There was a strange sound during initial cranking but soon stopped and has not returned. I assumed it was the belts seating for the first time. After letting it idle for a while I checked for leaks from the heater hoses and made sure the temperature gauge was responding which indicated the cooling system probably had no trapped air. I then filled the inter-cooler reservoir and made sure the pump was circulating the coolant. It was then topped up after the car was stopped. I took the car for a short drive around the block. The throttle response was kind of weird. Its going to take some getting use to. There was also some sounds that were a little strange so I cut the drive short and did some inspection. I could not find any water leaks and the belt looked good. I called it a day.
I re-installed the bumper shroud and front facia. Installing the plastic rivets was a challenge without the proper rivet tool. I broke one trying to install it. I then took the car for another drive. The car seemed to buck a lot in first gear. Part way through the drive the check engine light came on. I used my Predator to reveal that the the trouble codes were P0171 and P0174, System lean on banks 1 and 2. Coming to a stop the engine would also hold at about 2000RPM with the clutch in for about 3 seconds before coming to the normal Idle RPM. After the drive I remembered that I forgot to disable the traction control, that may have been the cause of the bucking. I cleared the fault codes and prepared for another test drive but the weather ended that.
The next drive was pretty much the same as the first. The check engine light came on quickly after starting out with the same lean condition error codes. In third gear under boost the engine would cut out at about 5000 RPM. Things just did not seem right. I called Tim at Mr. Norms for some advice. After a brief conversation he asked me to perform a log of the Intake Manifold Pressure reading while the engine was off. This showed that I had an incorrect MAP sensor. Apparently Dodge sent a bunch of senors to KB with the same part number as their older units but the output of these sensors was completely different from normal. I live at sea level and I was getting readings of 75.8 KPA for atmospheric, obviously way too low. I had to leave for my trip to the Allen Berg Race School in Willows California so I did not have a chance to resolve this issue until I got back.
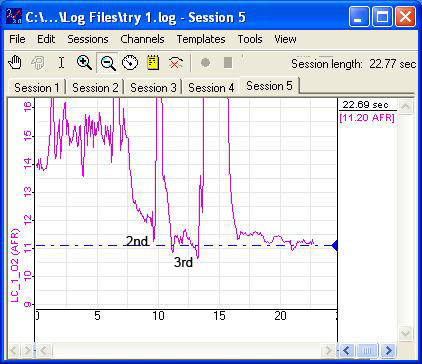
When I got back from my trip I had a new tune sent from KB sitting in my Inbox. After some issues with my programmer I finally got this installed. The MAP sensor now reads 98.8 KPA. That sounded about right so I took the car for another drive. The car ran much smoother. The idle issue went away and no engine lights came on. More importantly, the engine pulled hard and smooth through all gears. Hitting the gas in first gear not pretty much smokes the tires. This is going to be real fun. I can not wait to take it to Mission Raceway. I performed a log of my AFR just to make sure there was not any lean conditions. It seems ok but need to log on the track in higher gears as well.
|
||||
| Last Updated on Friday, 03 June 2011 10:32 |